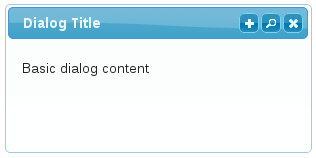
The titlebar of the dialog widget contains, surprisingly, the dialog title. But it also contains the close button. This is a useful component of the dialog that's mostly closed off to the developer, at least as for as the widget API is concerned. The best you can do is set the title text, or respond to the close event when the close button is clicked. Depending on your dialog content, the title bar may be the appropriate place to add new dialog buttons. The buttons option lets the developer add larger text buttons to the bottom of the dialog. But again, maybe that's not what you're after. You can extend the dialog widget and add a new option that allows developers to add new icon buttons to the titlebar.
Here's an example that adds a new iconButtons option to the dialog. So you can add a "search" or a "new" button, for instance, and have them appear to the left of the close button that comes standard with the widget.
The new iconButtons option defaults to an empty array — so no custom buttons are added unless specified in the dialog options. Here's how our extension overrides the _create() method to render the icon buttons in the titlebar.
_create: function() {

    this._super();

    var $titlebar = this.uiDialog.find( ".ui-dialog-titlebar" );

    $.each( this.options.iconButtons, function( i, v ) {

        var $button = $( "<button/>" ).text( this.text ),
            right = $titlebar.find( "[role='button']:last" )
                             .css( "right" );

        $button.button({
            icons: { primary: this.icon },
            text: false
        }).addClass( "ui-dialog-titlebar-close" )
          .css( "right", ( parseInt( right ) + 22) + "px" )
          .click( this.click )
          .appendTo( $titlebar );

    });

}
The first thing we do in _create() is find the titlebar element using the .ui-dialog-titlebar selector, and put it in the $titlebar variable. Next we iterate over the iconButtons array, and create a new button widget. The text property of the button is set as the button text while the click property is bound as the click handler. Each button is positioned by finding the leftmost button in the titlebar, and placing it to the left. So the order of the iconButtons array is reversed once rendered in the titlebar. And here's how the new option is put to use.
$( "#dialog" ).dialog({
    iconButtons: [
        {
            text: "Search",
            icon: "ui-icon-search",
            click: function( e ) {
                $( "#dialog" ).html( "<p>Searching...</p>" );
            }
        },
        {
            text: "Add",
            icon: "ui-icon-plusthick",
            click: function( e ) {
                $( "#dialog" ).html( "<p>Adding...</p>" );
            }
        }
    ]
});
No comments :
Post a Comment